
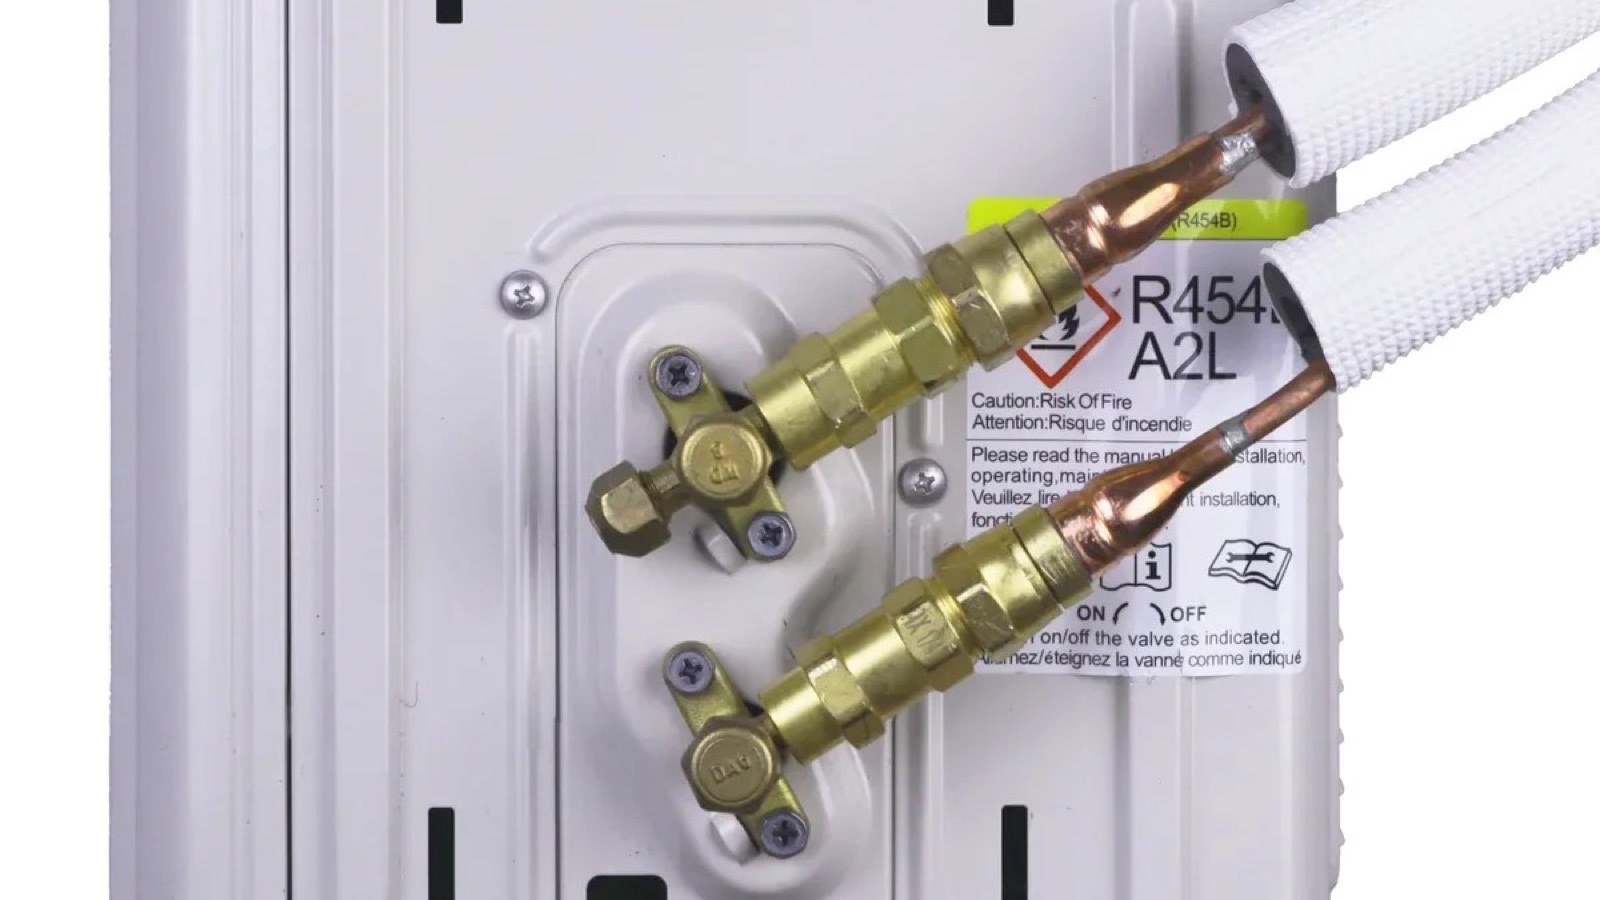
In 2026, a DIY mini split no HVAC contractor ever touches is a realistic weekend project, as long as you pick a system that has a factory precharged line set with quick connect fittings. Because the refrigerant is sealed in the line set and outdoor unit at the factory, you never have to pull a vacuum, hook up gauges or handle refrigerant. You still need to know basic carpentry, have the right electrical circuit, and read the manual carefully.
Can you install a mini split without an HVAC contractor?
It is, with the right kind of system. With a precharged quick connect system the refrigerant circuit stays sealed until you make the final connection and open the service valves, so the install has no vacuum pump, no gauge set and no EPA 608 certification step in it. Once you have the electrical circuit ready, you can expect a first-time single-zone wall install to take about four to six hours for two people, according to Zone Air's FAQ.
The basic flow:
- On its wall plate, the indoor unit is mounted.
- Drill through the wall so you can run the line set, the drain and the cable to the outside.
- Set the outdoor unit on a pad that is level, or on wall brackets.
- Connect the precharged fittings and torque them to spec.
- You will open the service valves, power up, leak-check and test in cooling and heating.
Systems with flare fittings are a different kind of job. Brands like Pioneer and Senville ship line sets that have to be evacuated with a vacuum pump, and Senville's warranty needs a licensed HVAC professional to do it. Our guide to the best mini split with no vacuum pump needed covers which systems are truly precharged.
How a DIY mini split works
There are three parts to a ductless mini split: an outdoor unit with the compressor and outdoor coil, an indoor unit with the evaporator coil, fan and filter and an insulated copper line set that carries refrigerant between them. Because there is no ductwork, mini splits work well for additions, garages, bonus rooms and older homes.
Three things make a system DIY-friendly:
- Factory precharged line sets. You never have to flare the lines, braze the joints or evacuate the refrigerant circuit.
- Quick connect fittings with built-in seals that only let refrigerant flow once you have made the connection and opened the valves.
- Manuals and packaging written for homeowners, not for licensed technicians.
Current DIY mini splits are inverter heat pumps, so they have a variable-speed compressor to cool in summer and heat in winter. Single-zone sizes usually run from 9,000 to 18,000 BTU, and multi-zone systems serve two or more rooms from one outdoor unit.
What a precharged line set is
A precharged line set is a pair of insulated copper lines, one liquid and one suction, filled with refrigerant (R-454B on current DIY systems) and sealed at both ends. When you thread and torque the fittings and then open the service valves per the manual, refrigerant moves through a circuit that has never been open to air, so there is nothing to evacuate or charge.
Don't mix up "pre-insulated" with "precharged." Pre-insulated lines only come wrapped in foam. You still have to flare, vacuum and charge them. Read the product description carefully.
Line set lengths differ by brand:
- Zone Air: 16, 25, 33, 50 and 75 ft or cut to any whole foot from 5 to 75 ft. Each length is one continuous run that is sealed at the factory, with no extension or coupler. With single-zone wall systems, a 16 ft set is included in the box.
- MRCOOL DIY: 11.5, 16, 25, 35 and 50 ft, plus couplers that join two sets up to 75 ft per indoor unit, per its catalog. Extra line is coiled behind the condenser.
- Senville LETO: the outdoor unit is charged for up to 25 ft. Its 50 ft kit needs refrigerant added on site.
Handle the line set gently: no kinks, no crushing, no tight bends. Once a Zone Air system has been connected, charged or run, it can no longer be returned, and the warranty takes over.
Refrigerant laws and licensing
This is the part to get right, so here is how the rules actually work.
Federal (EPA Section 608). The EPA's Section 608 program certifies people who service refrigerant circuits and covers refrigerant sales. Since 2018, buying HFC refrigerant such as R-410A or R-454B in containers over 2 lb requires 608 certification, and venting refrigerant is illegal for everyone, certified or not. A precharged quick connect install never opens the circuit to air and adds no refrigerant, which is why these kits are sold to homeowners. The practical catch: if the system ever runs low, a homeowner has no legal way to buy refrigerant to top it up. That repair goes to a certified technician.
State and local. Licensing and permits are set by your state, county or city, not the EPA. Many places let homeowners do mechanical and electrical work on their own home with a permit; others require a licensed contractor for some or all of it. A new 230V circuit, breaker or outdoor disconnect almost always falls under the electrical code. Call your building department before you start.
What a DIYer should never do: cut, flare or open the lines on a charged system, or vent refrigerant. That breaks federal rules, voids the warranty and is a safety risk with A2L refrigerants like R-454B.
A hybrid approach works well for many people: do the mounting, line set and fittings yourself, then have a licensed electrician run or check the circuit.
Choosing the right size
For a room with normal insulation and 8 to 9 ft ceilings, a common rule of thumb is about 20 BTU per square foot. For reference, Zone Air has its 9K rated for up to 450 sq ft, its 12K for up to 600 and its 18K for up to 900.
| Room | Approx. area | Typical size |
|---|---|---|
| Bedroom or home office | 200–400 sq ft | 9,000 BTU |
| Large bedroom or living room | 400–600 sq ft | 12,000 BTU |
| Open living area or primary suite | 600–900 sq ft | 18,000 BTU |
Size up for full sun, lots of glass, poor insulation, high ceilings or a garage. Don't make it too big either: a unit that's too big short-cycles and dehumidifies poorly. For multi-zone, size each indoor unit for its own room. Zone Air's sizing calculator is a good check before you order.
Single-zone or multi-zone?
A single-zone system is made up of one indoor unit and one outdoor unit. It's the simplest, cheapest first project and the one most first-time installers should start with: a 9,000 or 12,000 BTU wall unit in a bedroom, office or garage.
Multi-zone systems run two or more indoor units from one outdoor unit, with separate temperature control in each room and less equipment outside. Zone Air runs two or three indoor units on one 27,000 BTU outdoor unit and, per its FAQ, lets you add a head later to a spare port. MRCOOL's DIY multi-zone condensers go up to six zones. A single-zone outdoor unit can't be converted to multi-zone later, so if you expect a second room within a few years, start with the multi-zone outdoor unit.
Wall mount, ceiling cassette or concealed duct
- Wall mount: the easiest DIY install. Mount a plate, hang the unit and run the lines through the wall behind it. Best for a first project.
- Ceiling cassette: sits flush in the ceiling and blows air in several directions. It needs a framed opening, enough cavity depth and careful drain planning. Zone Air's cassette body is 9-5/8 in tall and needs a framed opening. MRCOOL's OuttaSight cassette fits between 16 in joists.
- Concealed ducted: hidden above a hallway or in an attic, with short ducts that feed one or more rooms. This gives the cleanest look and the most work: duct sizing, balancing and insulation. Zone Air's Thin-Air unit is 7⅞ in tall, and as of October 2026 it is the only DIY concealed ducted mini split system.
Zone Air is also the only DIY mini split that lets you mix wall-mount, ceiling cassette and concealed ducted units on one outdoor unit, as of October 2026 (system builder). Start with wall mount. Treat cassette and concealed units as a second project or a job to share with a carpenter.
DIY-friendly brands compared
Not every brand that calls itself DIY-friendly lets a homeowner install it and keep the warranty. Here is how the common names line up.
Zone Air. Precharged quick connect on every system. The warranty is 5 years parts and 7 years compressor with no registration cut-off, and installing it yourself does not void it. The 9K 115V is 23 SEER2 and the 230V 9K and 12K are 24 SEER2, the highest of the precharged quick connect brands compared here. Every system heats to −13°F, and the 115V models can plug into a dedicated outlet with an optional cord kit where local code allows. 30-day returns on uninstalled units.
MRCOOL DIY. Also precharged quick connect, and its DIY 5th Gen warranty is 5 years parts and 7 compressor with no registration needed. The standard 5th Gen heats to about −13°F, the Easy Pro line to 5°F, and higher-tier DIY models are rated lower. Check the tier: DIY Select units carry only 1 year parts and 2 years compressor. MRCOOL's Trustpilot profile showed 3.1 out of 5 across 91 reviews in October 2026, with people talking about warranty denials on self-installed units and slow support.
Senville. Good prices, but not a no-contractor system. Its warranty page says the line sets must be pressure tested and evacuated by a licensed HVAC professional and that "DIY installation will void your warranty coverage."
Pioneer. Pioneer's standard line sets use flare fittings that need a vacuum pump. Its warranty is 1 year on parts unless you register within one week after the system is properly installed, which extends it to 5 years.
Mitsubishi, Fujitsu, LG, Daikin. Premium systems built around contractor installation. Mitsubishi's warranty runs from installation by a licensed HVAC contractor, so these aren't a fit for a no-contractor install.
For a step-by-step look at the easiest install path, you can see our guide to the easiest DIY mini split installation with precharged quick connect line sets.
Tools and skills you need
Precharged line sets take away the need for refrigerant tools, but they don't take away the need for carpentry.
- A drill and a hole saw that is 3 in to 3-1/2 in
- Level, tape measure and stud finder
- Two adjustable wrenches and a torque wrench so you can tighten the fittings to the right torque
- Screwdrivers, pliers and a utility knife
- Spray bottle of soapy water for leak checks
- Eye protection, gloves, a sturdy ladder and someone to help you lift the outdoor unit
You should be comfortable drilling through an exterior wall, attaching a bracket to studs or masonry, running and protecting the line set, and either wiring a 115V unit to its dedicated circuit or working with an electrician on a 230V circuit. A flaring kit and vacuum pump, the $400 to $600 tool wall Zone Air's FAQ describes for conventional systems, aren't needed.
Planning the install
Indoor unit. Mount it high on the wall, ideally on an exterior wall so the line set run is short, away from heat sources and direct sun, with the clearances the manual lists.
Outdoor unit. A level pad or wall brackets, with the manufacturer's clearances on all sides. In snow country, raise it above the expected snow depth.
Line set route. Plan the shortest, smoothest path with gentle bends, stay within the model's minimum and maximum lengths, and avoid sharp kinks. A line set cut to the right length avoids coiling extra line behind the condenser.
Condensate drain. The drain line has to slope downhill all the way to a safe discharge point. If gravity won't work, use a condensate pump.
Power. Zone Air's 9K and 12K 115V units need a dedicated 15A circuit. MRCOOL's 9K and 12K 115V units are hardwired. 18K and larger systems on both brands run on 208/230V and need a dedicated circuit and a disconnect per local code. Check panel capacity before you order.
Installing a precharged line set system
This is an overview, not a replacement for your manual.
- Mount the wall plate. Find the studs, level the plate and fasten it with wall anchors suited to the wall.
- Drill the wall. Drill the hole so it has a slight downward slope to the outside and fit the wall sleeve.
- Hang the indoor unit. Feed the line set, drain hose and cable through the sleeve and hook the unit onto the plate.
- Set the outdoor unit. Level it on the pad or brackets, leaving enough slack in the lines to make the connections.
- Connect the precharged lines. Uncoil the line set without kinking it, start each fitting by hand, then tighten to the torque that the spec calls for. You will open the service valves as the manual directs.
- Wire it. Connect the indoor-to-outdoor cable terminal for terminal and connect power at the outdoor unit per local code.
- Test. Spray soapy water on every connection and watch for bubbles, then run cooling and heating and check airflow and drainage.
Will a DIY install void the warranty?
It depends completely on the brand. Zone Air states that installing it yourself does not void coverage. MRCOOL's DIY 5th Gen warranty has no licensed-installer requirement and no registration. Senville says DIY installation voids its warranty. The premium brands tie coverage to a licensed or certified contractor.
Before you buy, check:
- Parts and compressor terms, and which product tier they apply to
- Whether a homeowner install is clearly allowed for you
- Whether registration is needed, and by when
- Exclusions for install damage such as kinked lines or fittings that were over-torqued
Keep dated photos of each install step, the receipt and the serial numbers. They make any warranty claim easier.
What does it cost?
The equipment is the bulk of a DIY budget. The Zone Air 9K 115V was $1,899.99 in October 2026 with the 16 ft precharged line set in the box. Add the wall sleeve and pad if needed, any tools you don't own, and an electrician if you need a new circuit or a panel upgrade. Get a local installed quote for the same size to see your savings, since contractor pricing varies a lot by region.
The federal 25C tax credit for heat pumps ended for equipment placed in service after December 31, 2025, per the IRS. Some state and utility rebates still apply. Check whether yours takes a homeowner install.
Common line set mistakes
- Kinking the copper while you pull it through a tight hole
- Bending tighter than the manual's minimum bend radius
- Crushing the insulation under clamps or straps
- Cross-threading a fitting. Always start by hand
- Under- or over-torquing the fittings
- Opening the service valves before every connection is tight
- Going past the maximum line length or height difference between the units
- Running the drain uphill or leaving it loose
Read the manual once, from start to finish, before you drill anything.
DIY mini split heat in cold climates
A modern inverter heat pump rated to −13°F can carry most of the heating load in much of the country. Zone Air rates every system to −13°F, the same floor as MRCOOL's standard DIY 5th Gen. Output falls as it gets colder, so homes that see long periods below that should keep backup heat. Good insulation and air sealing matter as much as the equipment.
Maintenance
- Clean the indoor filters every one to three months
- Keep the outdoor coil clear of leaves and grass
- Make sure the condensate drain flows freely
- Check the line set insulation each season for UV damage or chewing
A professional check-up is optional, and it's the right call if you ever suspect a refrigerant leak, since only a certified tech can add refrigerant.
When to call a pro anyway
An electrician for a panel upgrade, a new 230V circuit, the outdoor disconnect or any wiring you aren't sure about.
An HVAC technician if a precharged line set is damaged, you suspect a leak (hissing, icing, warm air), or the system keeps throwing error codes after a proper install.
A carpenter for cutting into joists for a cassette, or any change to load-bearing framing.
Is a no-contractor install right for you?
If you've hung cabinets, installed a ceiling fan or wired a circuit with a permit, you can handle a single-zone wall mount. Start with one room, use a precharged quick connect system whose warranty lets homeowner installs happen, and leave the electrical to a pro if you're not comfortable with it.
Related guides
- Best mini split with no vacuum pump required
- Easiest DIY mini split installation: pre-charged quick connect
- Pre-charged quick-connect line sets explained
- DIY mini split that plugs into an outlet
- MRCOOL vs Zone Air: DIY mini split comparison
Get a quote on a DIY mini split
Specs, prices and warranty terms are manufacturer-published as of October 2026, subject to change. Verify before you buy. MRCOOL®, Senville®, Pioneer®, Mitsubishi, Fujitsu, LG, Daikin and Zone Air are trademarks of their owners. HVAC On Sale is not affiliated with or endorsed by MRCOOL, Senville or Pioneer.